Kubernetes
Volume Providers
If your application needs a distributed storage and needs to handle large amounts of data, you are not limited only to local hard drives. Kubernetes also supports Volume Providers. Currently, the list of available Persistent Volume Providers includes:
- GCE: Which is a Google Cloud platform
- AWS: Amazon Web Services
- GlusterFS: A scalable network filesystem. Using GlusterFS, which is free and an open source software, you can use your existing storage hardware to create large, distributed storage solutions
- OpenStack Cinder: A block storage service for users of the OpenStack Nova compute platform
- CephRBD: A Reliable Autonomic Distributed Object Store (RADOS), which provides your applications with object, block, and file system storage in a single unified storage cluster
- QuoByte
- Kube-Aliyun
ReplicaSet
ReplicaSet is the concept used in scaling your application by using replication. What is Kubernetes replication useful for? Typically, you would want to replicate your containers (which are, in fact, your application) for several reasons, including:
Scaling: When load increases and becomes too heavy for the number of existing instances, Kubernetes enables you to easily scale up your application, creating additional instances as needed. Load balancing: We can easily distribute traffic to different instances to prevent overloading of a single instance or node. Load balancing comes out of the box because of Kubernetes' architecture and it's very convenient. Reliability and fault tolerance: By having multiple versions of an application, you prevent problems if one or more fail. This is particularly true if the system replaces any containers that fail.
Replication is appropriate for numerous use cases, including microservice-based applications wheremultiple, independent small services provide very specific functionality, or cloud native applications that are based on the theory that any component can fail at any time. Replication is a perfect solution for implementing them, as multiple instances naturally fit into the architecture.
A ReplicaSet ensures that a specified number of Pod clones, known as replicas, are running at any given time. It there are too many, they will be shut down. If there is a need for more, for example some of them died because of an error or crash, or maybe there's a higher load, some more Pods will be brought to life. ReplicaSets are used by Deployments. Let's see what Deployments are. Deployment
A Deployment is a higher level of abstraction; it manages ReplicaSets when doing Pod orchestration, creation, deletion, and updates. A Deployment provides declarative updates for Pods and ReplicaSets. The Deployment allows for easy updating of a Replica Set as well as the ability to roll back to a previous deployment.
You just specify the number of replicas you need and the container to run within each Pod and the Deployment controller will spin them up. The example Deployment manifest definition in the YAML file looks the same as the following:
apiVersion: 1.0

kind: Deployment

metadata:

  name: rest_service-deployment

spec:

  replicas: 3

  template:

    metadata:

    labels:

    app: rest_service

  spec:

    containers:

    - name: rest_service

      image: rest_service

      ports:

      - containerPort: 8080
Replication is a large part of Kubernetes' features. As you can see, the life of a Pod is delicate and ephemeral. Because Pods and their clones come and go all the time, we need something permanent and tangible, something that will stay forever so our application's users (or other Pods as well) can discover and call. This brings us to the concept of Kubernetes services.
Services
In Kubernetes, cluster Pods can communicate with other Pods, regardless of which host they land on. This is possible because of the services. Each service is given its own IP address and port which remains constant for the lifetime of the service. Services have an integrated load-balancer that will distribute network traffic to all Pods. While a Pod's life can be fragile as they are being spun up or down depending on your application needs, the service is a more constant concept. Each Pod gets its own IP address, but when it dies and another one is being brought to life, the IP address can be different. This could potentially become a problem--if a set of Pods provides functionality to other Pods inside the Kubernetes cluster, one can lose track of the other one's IP address. Services, by having a lifetime-assigned IP address, solves this issue. The Service abstraction enables decoupling. Let's say we have our Java REST service running on top of the Spring Boot application. We need a way to route HTTP requests, such as GET or POST, from the internet to our Docker containers. We will do it by setting up a Kubernetes service that uses a load balancer to route requests coming from a public IP address to one of the containers. We will group the containers with the REST service into a Pod and name it, let's say, Our little REST service. Then we will define a Kubernetes service that will serve port 8080 to any of the containers in the our little REST service Pod. Kubernetes will then use a load balancer to divide the traffic between the specified containers. Let's summarize the Kubernetes service features:
- Services are persistent and permanent
- They provide discovery
- They offer load balancing
- They expose a stable network IP address
- They find Pods to group by usage of labels
We have said that there is a service discovery mechanism built-in. Kubernetes supports two primary modes of finding a service: environment variables and DNS. Service discovery is the process of figuring out how to connect to a service. Kubernetes contains a built-in DNS server for that purpose: the kube-dns.
Kube-dns
Kubernetes offers a DNS cluster add-on, started automatically each time the cluster is started up. The DNS service runs as a cluster service itself--its SkyDNS--a distributed service for announcement and discovery of services built on top of etcd (you will get to know what etcd is later in this chapter). It utilizes DNS queries to discover available services. It supports forward lookups (A records), service lookups (SRV records), and reverse IP address lookups (PTR records). Actually, the service is the only type of object to which Kubernetes assigns DNS names; Kubernetes generates an internal DNS entry that resolves to a service's IP address. Services are assigned a DNS A record for a name in the form service-name.namespace-name.svc.cluster.local. This resolves to the cluster IP of the service. For example, for a service named my-rest-service, the DNS add-on will make sure that the service will be available for other Pods (and other services) in the cluster via the my-rest-service.default.svc.cluster.local hostname. The DNS-based service discovery provides a flexible and generic way to connect to services across the cluster.
Note that when using the hostNetwork=true option, Kubernetes will use the host's DNS servers and will not use the cluster's DNS server.
There's one more concept that will appear from time to time during our Kubernetes journey--a namespace. Let's find out what it's for.
Namespace
A namespace functions as a grouping mechanism inside of Kubernetes. Pods, volumes, ReplicaSets, and services can easily cooperate within a namespace, but the namespace provides an isolation from the other parts of the cluster. What would be the possible use case for such isolation? Well, namespaces let you manage different environments within the same cluster. For example, you can have different test and staging environments in the same cluster of machines.
This could potentially save some resources in your infrastructure, but it can be dangerous; without namespaces, it would be risky to roll out a new version of your software to test the environment, having the pre-release version running on the same cluster. By having namespaces available, you can act on different environments in the same cluster without worrying about affecting other environments.
Because Kubernetes uses the default namespace, using namespaces is optional, but recommended.We have all the Kubernetes abstractions explained--we know that there are Pods, ReplicaSets, Deployments, and services. Now it's time to move to the physical, execution layer of Kubernetes' architecture. All those little, fragile Pods need to live somewhere. They live in nodes, which we are going to learn about now.
Nodes
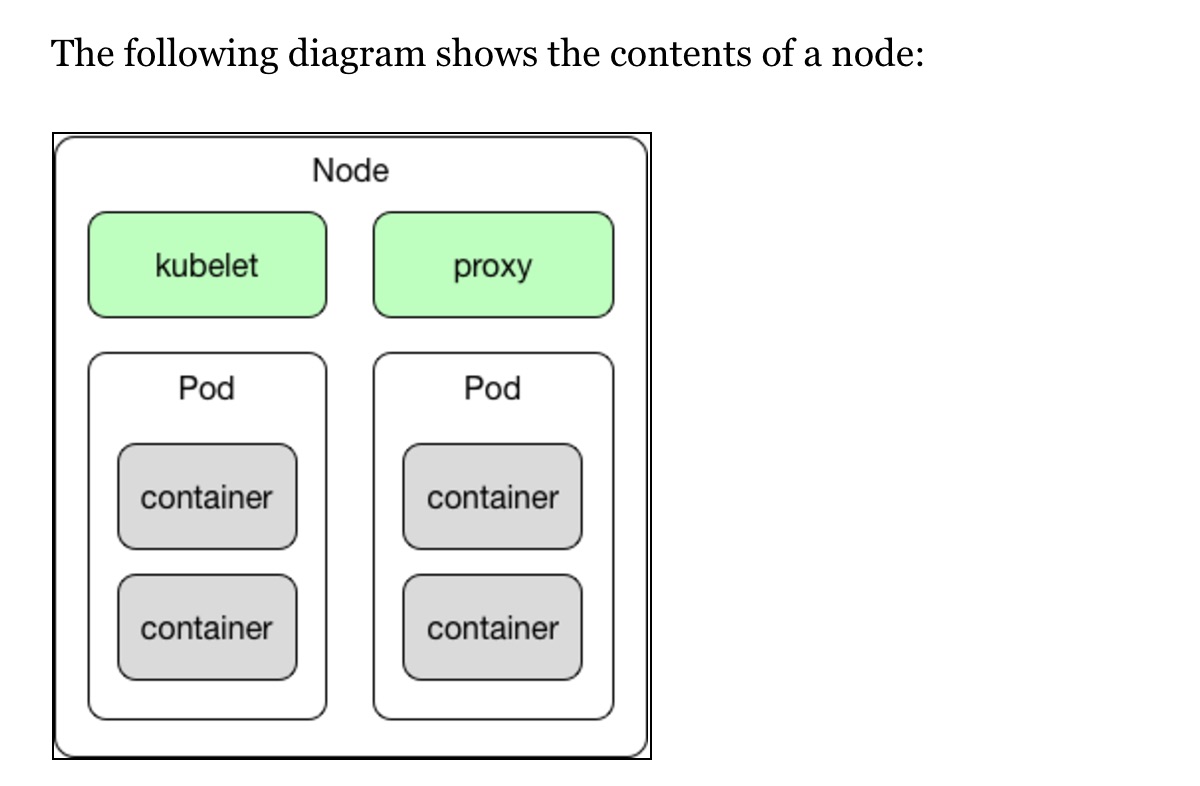
A node is a work horse in Kubernetes' architecture. It may be a virtual or physical machine, depending on your infrastructure. A worker node runs the tasks as instructed by the Master node, which we will explain very soon. Nodes (in the earlier Kubernetes life, they were called Minions) can run one or more Pods. They provide an application-specific virtual host in a containerized environment.
When a worker node dies, the Pods running on the node die as well.
Kubelet
Kubelet is probably the most important controller in Kubernetes. It's a process that responds to the commands coming from the Master node (we are going to explain what the Master node is in a second). Each node has this process listening. The Master calls it to manage Pods and their containers. The Kubelet runs Pods (which, as you already know, are collections of containers that share an IP and volumes). The Kubelet (https://kubernetes.io/v1.0/docs/admin/kubelet/) is responsible for what's running on an individual machine and it has one job: given a set of containers to run, to make sure they are all running. To rephrase, a Kubelet is the name of the agent and a node is what we call the machine the agent runs on. It's worth knowing that each Kubelet also has an internal HTTP server which listens for HTTP requests and responds to a simple API call to submit a new manifest
Proxy
A proxy is a network proxy that creates a virtual IP address which clients can access. The network calls will be transparently proxied to the Pods in a Kubernetes service. A service, as you already know, provides a way to group Pods into kind of a single business process, which can be reached under a common access policy. By having a proxy run on a node, we can call the service IP address. Technically, a node's proxy is a kube-proxy (https://kubernetes.io/docs/admin/kube-proxy/) process which programs iptablesrules to trap access to the service IP address. The Kubernetes network proxy runs on each node. Without it, we would not be able to access the service.kube-proxy knows only UDP and TCP, does not understand HTTP, provides load balancing, and is just used to reach services.
Finally, each node needs something to run. It will be a Docker container runtime, which is responsible for pulling the images and running containers.
All those nodes, as any other group of workers in the real world, need a manager. In Kubernetes, the role of the node manager is being performed by one special node: the Master node.
Master Node
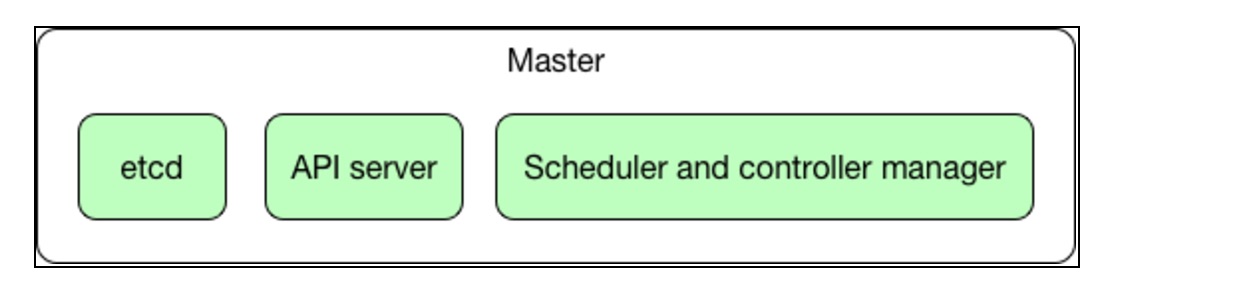
The structure of the Master node is presented in the following diagram:
The Master node does not run any containers--it just handles and manages the cluster. The Master is the central control point that provides a unified view of the cluster. There is a single Master node that controls multiple worker nodes, which actually run our containers. The Master automatically handles the scheduling of the Pods across the worker nodes in the cluster -by taking into account the available resources on each node.
etcd
Kubernetes stores all of its cluster state in etcd, a distributed data store with a strong consistency model. etcd is a distributed, reliable key-value store for the most critical data of a distributed system, with a focus on being:
- Simple: Well-defined, user-facing API Secure: Automatic TLS with optional client cert authentication Fast: Benchmarked for 10,000 writes/sec Reliable: Properly distributed using Raft
This state includes what nodes exist in the cluster, what Pods should be running, which nodes they are running on, and a whole lot more. The whole cluster state is stored in an instance of etcd. This provides a way to store configuration data reliably. Another crucial component running on the Master node is the API server.
One of the main components residing on the Master node is the API server. It's so important that sometimes, you may find out that the Master node is being referred to as the API server in general. Technically, it's a process named kube-apiserver which accepts and responds to HTTP REST requests using JSON. It's main purpose is to validate and configure data for the API objects which are Pods, services, ReplicaSets, and others. The API server provides the frontend to the cluster's shared state through which all other components interact. The API server is the central management entity and is the only Kubernetes component that connects to etcd. All the other components must go through the API server to work with the cluster state. We will cover the Kubernetes API in detail later, in Working With Kubernetes API.
The Master node does not run any containers--it just handles and manages the whole cluster. The nodes that actually run the containers are the worker nodes.
The Scheduler
As we have said before, if you create a Deployment, the Master will schedule the distribution of application instances onto individual nodes in the cluster. Once the application instances are up and running, the Deployment Controller will be continuously monitoring those instances. This is kind of a self-healing mechanism--if a node goes down or is deleted, the Deployment Controller replaces it.
Testing
The minikube tool, available at GitHub at https://github.com/kubernetes/minikube, allows you to set up the local cluster on your own machine. It's available for all major platforms, which includes Linux, macOS, and Windows. The cluster started will of course be a single node cluster, but it's more than enough to start doing real-life Kubernetes examples
Secrets with files
- Generate secrets using files:
$> echo -n "root" > ./user.txt
$> echo - n "password" > ./passwrd.txt
$> kubectl create secret generic db-user-pass --from-file=./user.txt --from-file=./passwrd.txt
secret "db-user-pass" created
- A secret can also be an SSH key or an SSL certificate:
$> kubectl create secret generic ssl-certificate --from-file=ssh-private-key=~/.ssh/id_rsa --ssl-cert=ssl-cert=usersslcert.crt
- Generate secrets using yaml definitions:
Create: secrets-db-secret.yml
apiVersion: v1

kind: Secret

metadata:

  name: db-secret

type: Opaque

data:

  password: s^pEr3eC8==

  username: OFJKHasidjfh=
Generate base64 strings:
$> echo -n "root" | base64
s^pEr3eC8==
$> echo -n "password" | base64
OFJKHasidjfh=
- After creating your yml file, use kubectl to create secret:
secret "db-secret" created
Using Secrets
- Create a pod that exposes the secrets as environment vars:
apiVersion: v1

kind: Pod

metadata:

  name: nodejs.lifetouch.us

  labels:

    app: nodejs

spec:

  containers:

  - name: k8s-nodejs

    image: ardeshir/nodejs

    ports:

    - containerPort: 3000

    env:

    - name: SECRET_USER

      valueFrom:

        secretKeyRef:

          name: db-secret

          key: username

    - name: SECRET_PASSWRD

[...]
- Provide secrets in a file:
apiVersion: v1

kind: Pod

metadata:

  name: nodejs.lifetouch.us

  labels:

    app: nodejs

spec:

  containers:

  - name: k8s-nodejs

    image: ardeshir/nodejs

    ports:

    - containerPort: 3000

    volumeMounts:

    - name: credvolume

      mountPath: /etc/creds

      readOnly: true

    volumes: db-secret

    - name: credvolume

      secret:

        secretName: db-secrets

[...]